Plumbing rough-in is the stage when water supply lines, drain, waste and vent pipes, and sewer connections go into walls, floors, or underground before insulation, drywall, and finished fixtures. You can expect exposed pipes, capped connections, testing, and inspections before the work gets covered.
In any new build, the main priority is getting the layout right while everything is accessible. We recommend paying attention to fixture locations, finished-wall measurements, and inspection records before construction moves forward.
Start with what belongs in a proper rough in and how those hidden connections support your finished home.
What Plumbing Rough-In Includes
Rough-in establishes the plumbing behind your sinks, toilets, showers, appliances, and water heater. Faucets and finished fixtures usually come later.
The main components include:
- Hot and cold water supply lines carry water to planned fixtures and equipment.
- Drain and waste pipes carry wastewater toward the sewer or septic connection.
- Vent pipes provide airflow through the drainage system.
- Stub-outs, cleanouts, and equipment connections provide access for installation and maintenance, including connections for a toilet or a dedicated lav drain.
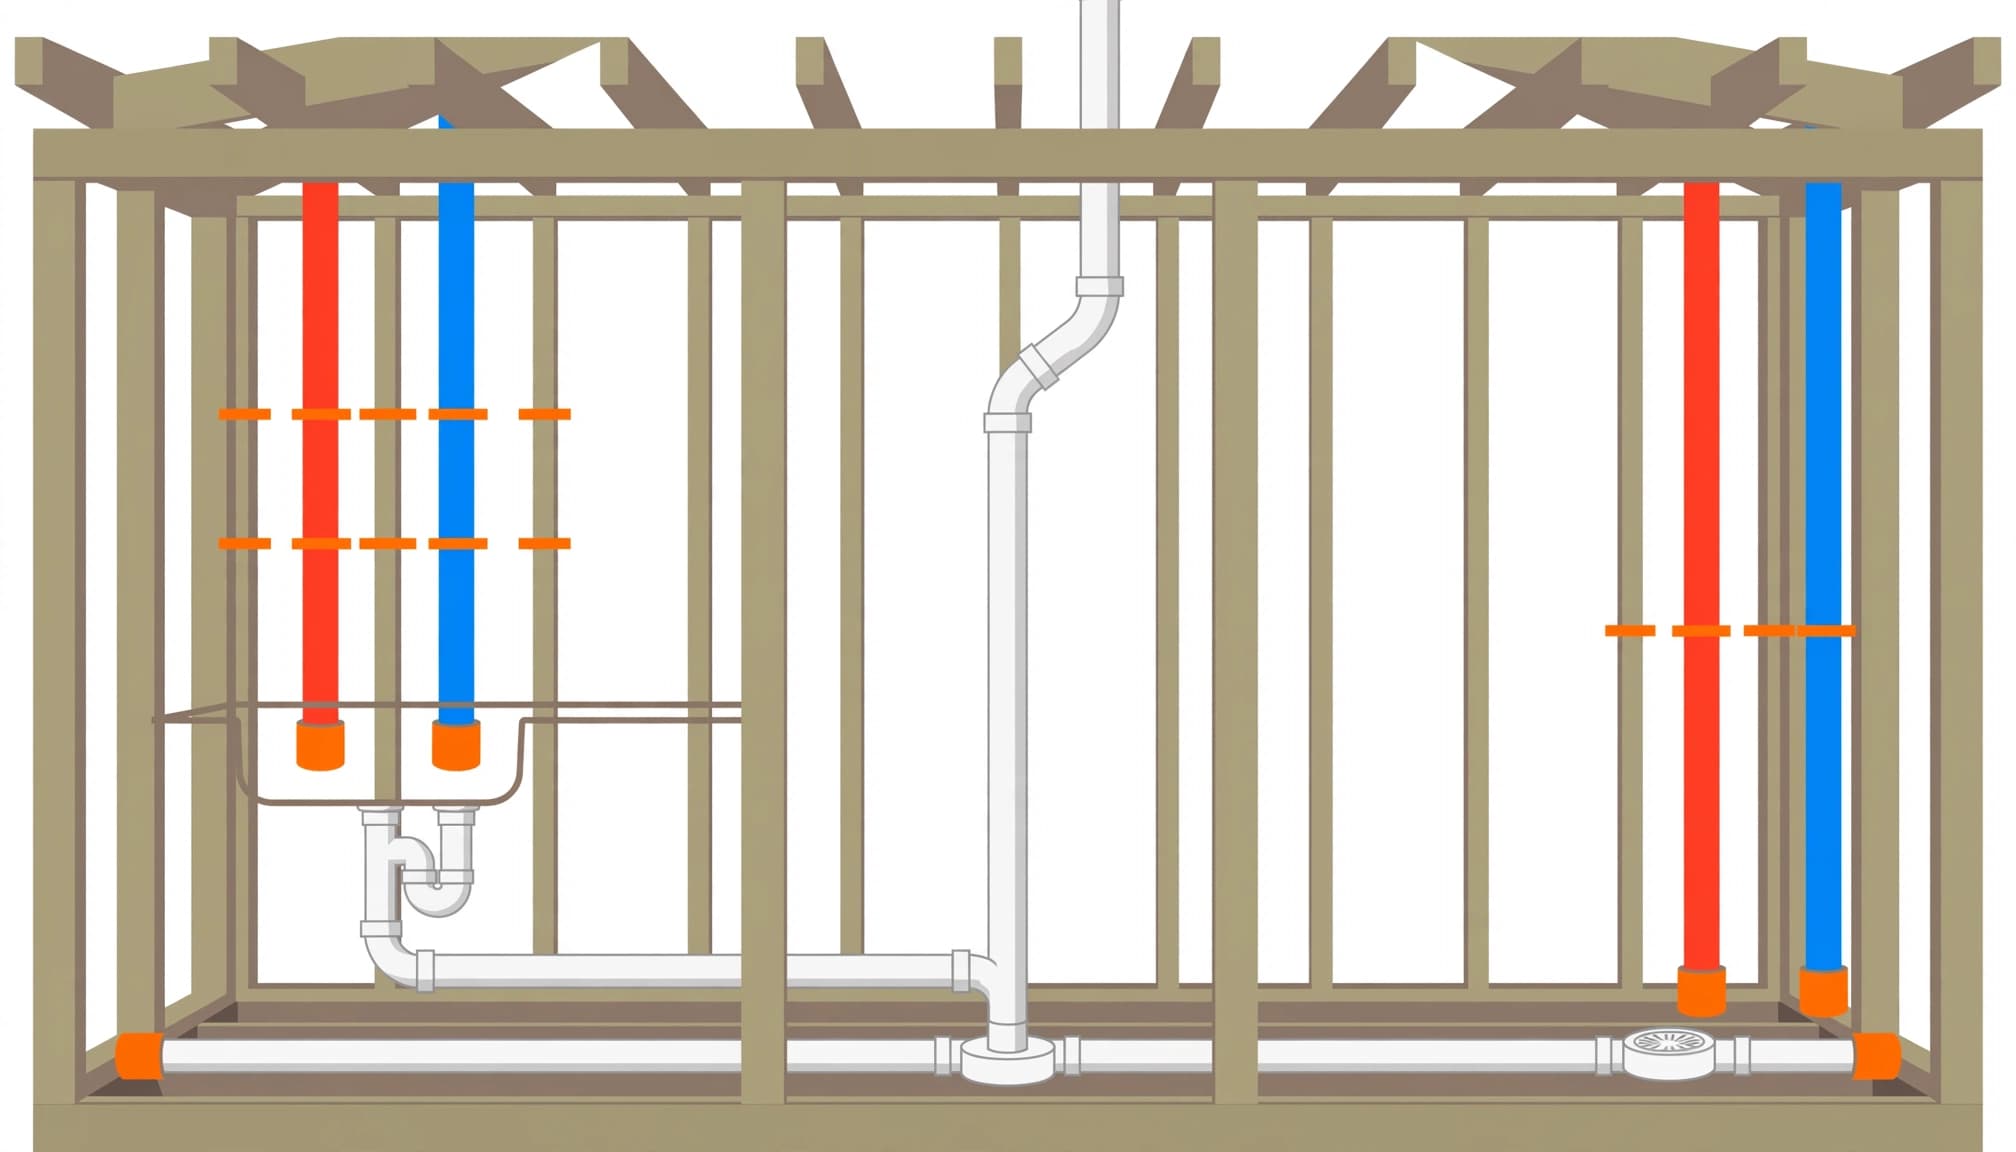
Supply lines commonly use PEX, copper, or CPVC. A common arrangement reduces 3/4-inch distribution lines to 1/2-inch fixture stub-outs, although the system design controls actual sizing.
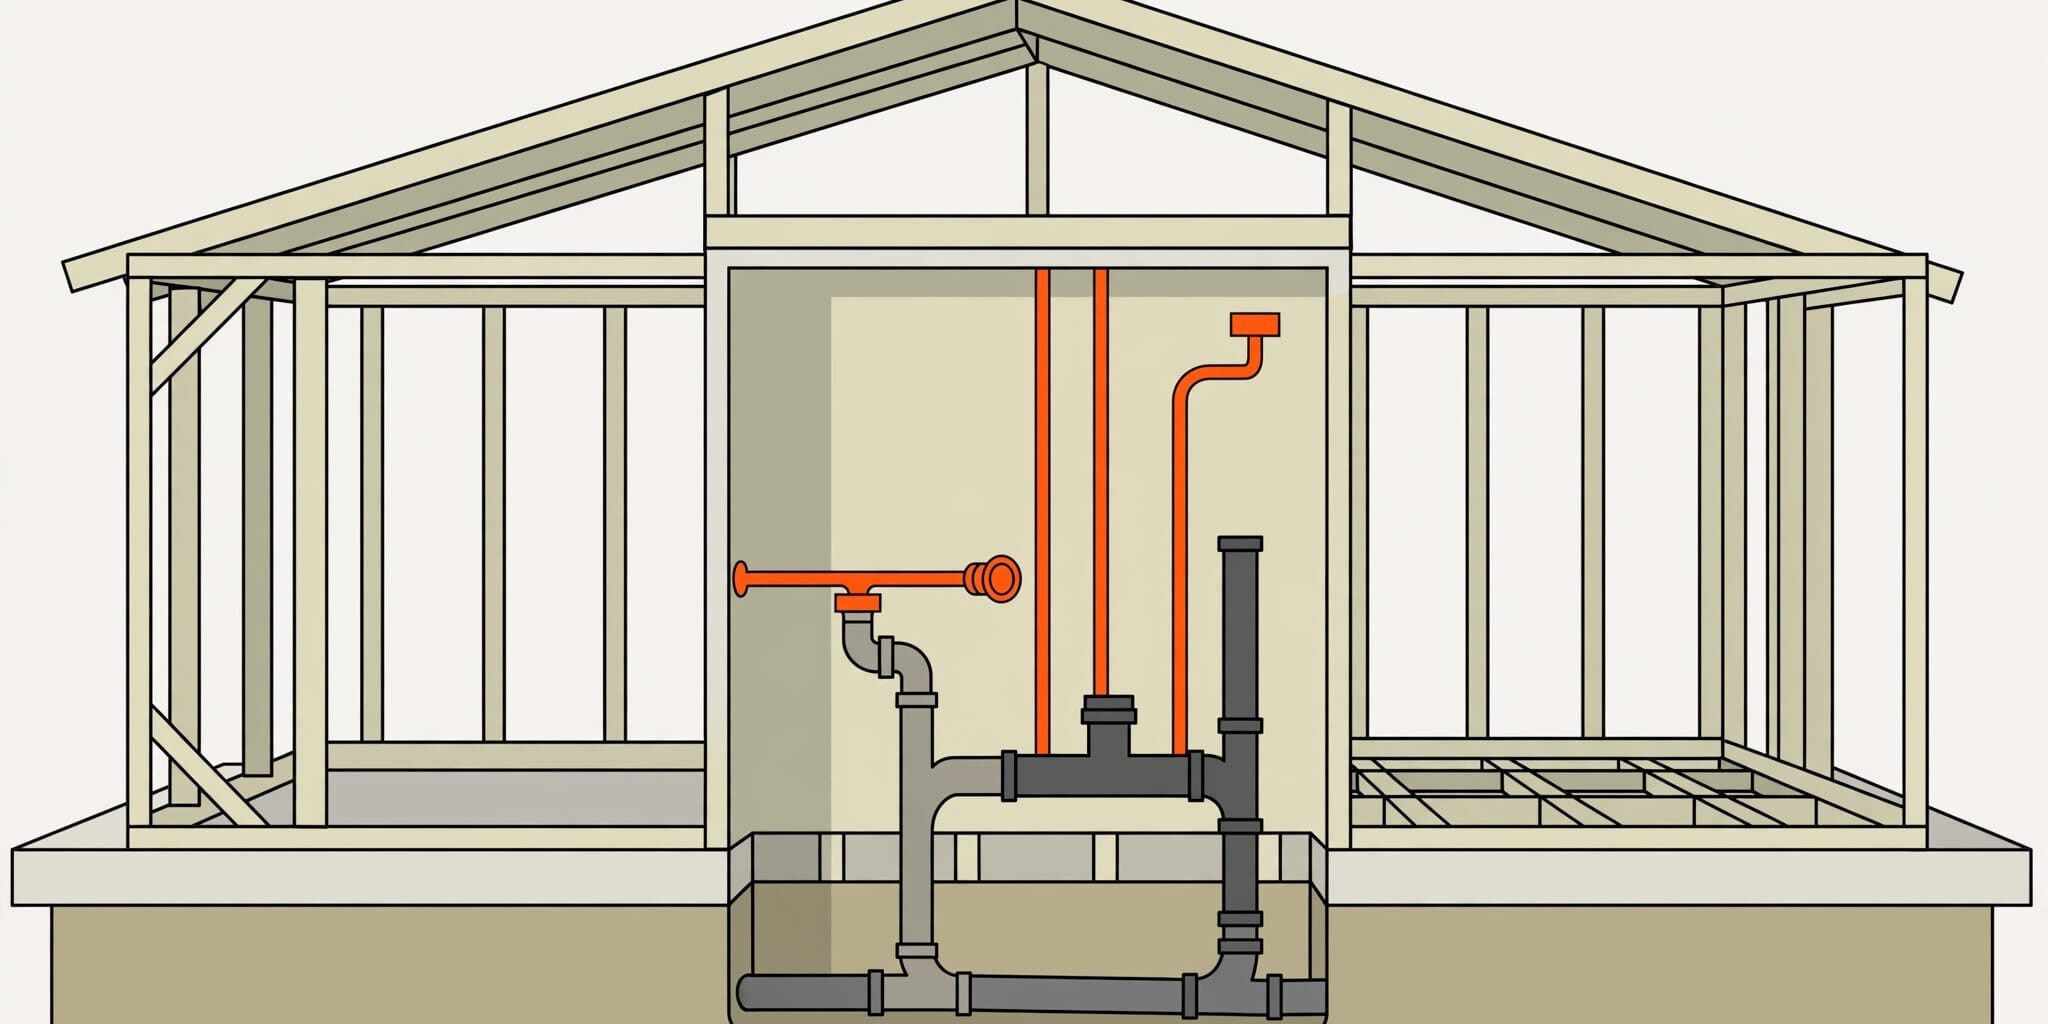
Drain, waste, and vent piping, often called DWV, typically uses heavy-duty PVC or ABS. Each primary drain pipe must be sized for its wastewater volume and installed at the correct pitch. Vent stacks generally extend through the roof.
These vents help drains function properly. Water-filled fixture traps provide the barrier against sewer gas entering the home. The International Plumbing Code’s vent provisions address vent connections and routing.
Cleanouts also need usable access. A connection hidden behind a permanent cabinet or finished surface can make future maintenance harder.
When Rough-In Happens During Construction
During a new build, plumbing rough-in usually happens in separate stages. Underground work comes first, followed by the piping installed after framing.
Underground Plumbing Before the Slab
For ground-level foundations and basement floors, crews excavate and install underground drains before the foundation pour. Riser locations, supports, sleeves, cleanouts, and protective caps belong in the pre-pour review.
Many Cape Coral homes use single-level grade construction, so this stage deserves close attention. Moving a bathroom drain after the pour can require opening the concrete.
Our guide to the Florida slab pour process covers the foundation work that surrounds these underground connections.
The vapor barrier also needs proper sealing around plumbing penetrations. Torn material and open seams need repair before placement.
Wall Plumbing After Framing
Once framing is ready, plumbers install the remaining supply lines, drain branches, vent piping, and fixture connections.
This work must fit alongside electrical wiring, HVAC equipment, framing, and cabinets. A line can be in the right room but still interfere with a drawer or planned appliance.
We recommend finalizing fixture selections and cabinet layouts before this stage. Late changes affect labor, materials, and the construction schedule.
Bathroom Plumbing Rough-In Dimensions
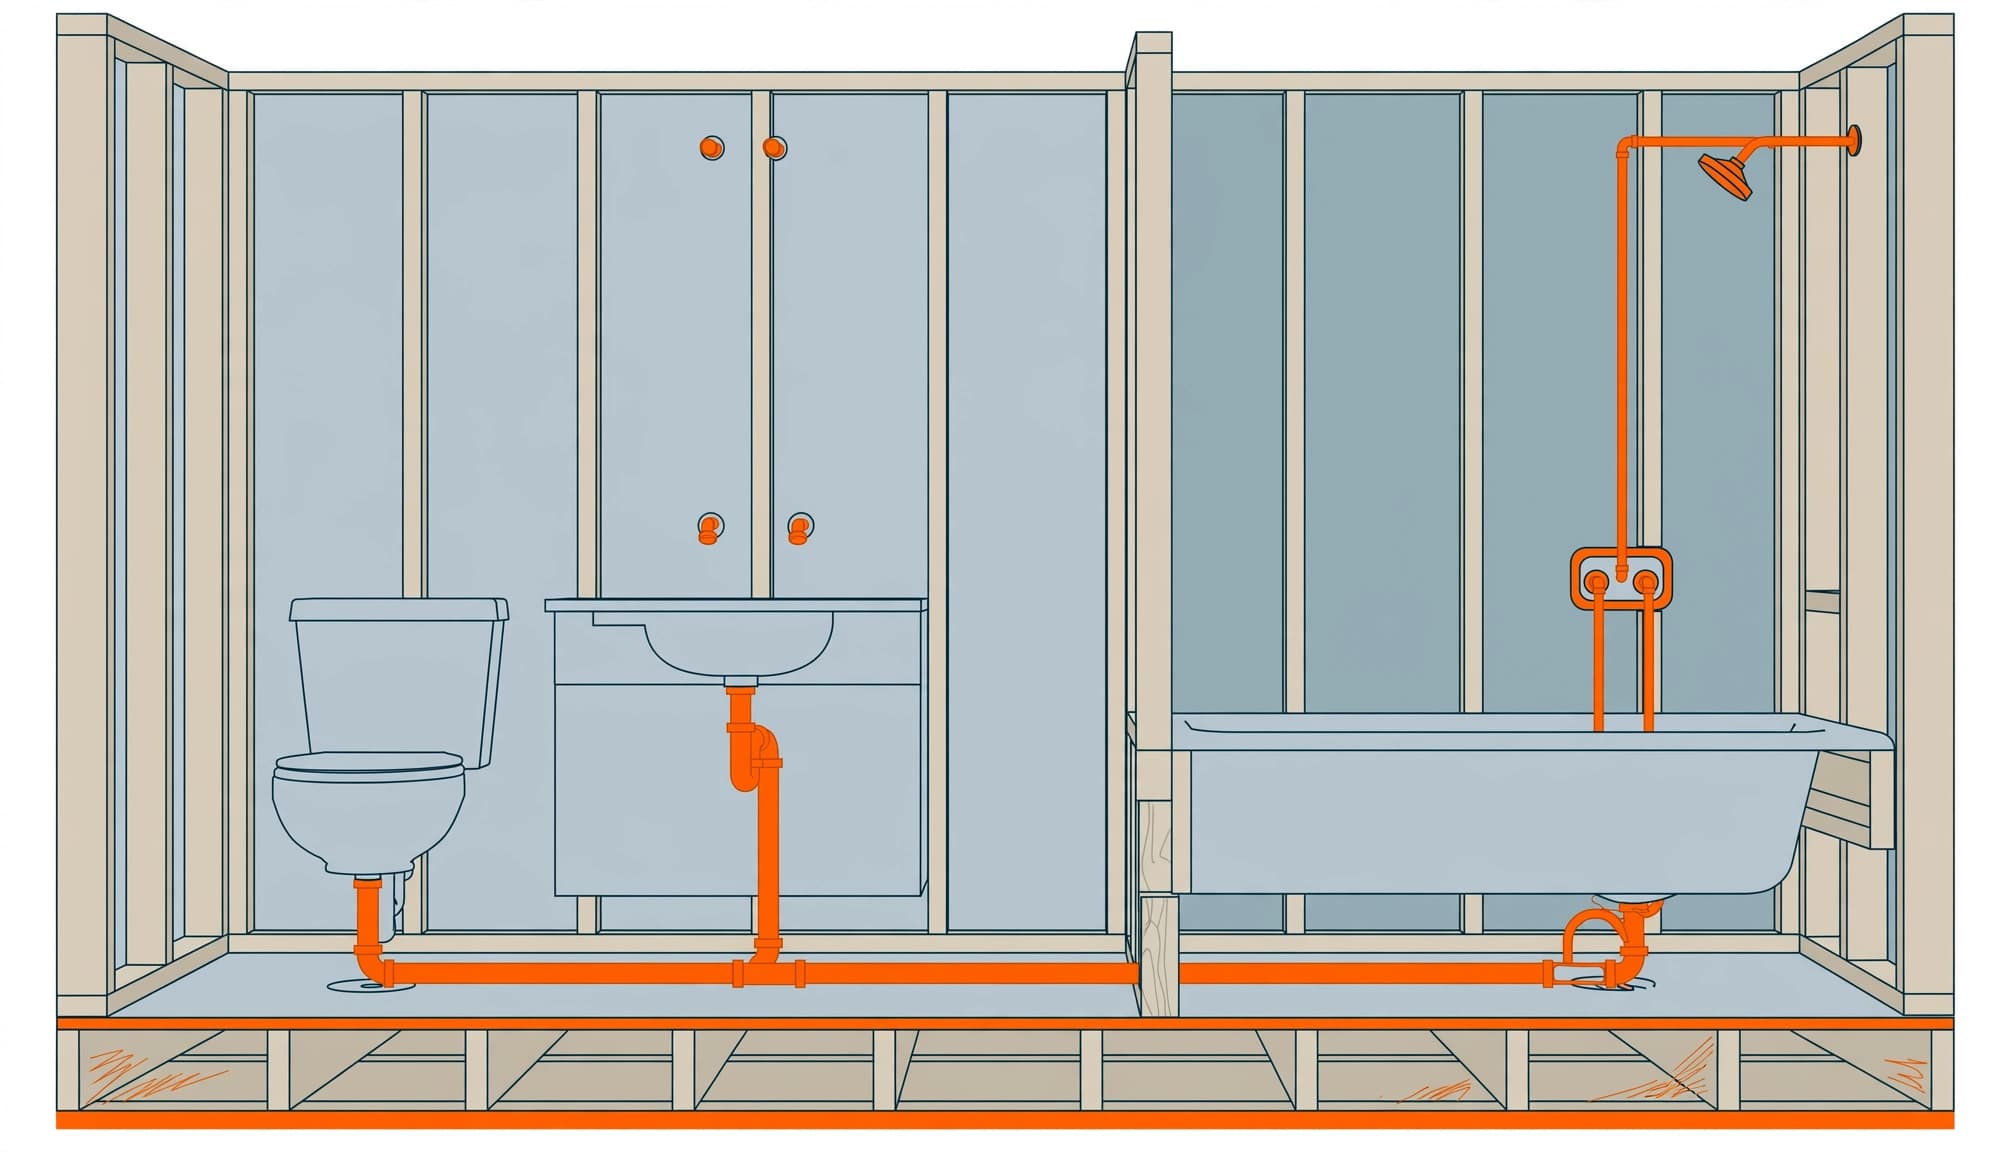
Bathroom dimensions are measured from finished surfaces, not simply exposed studs or the unfinished subfloor. Drywall, tile, flooring, and wall finishes all affect the final position.
These are common planning dimensions, not universal installation requirements.
| Connection | Typical Planning Dimension |
|---|---|
| Toilet flange center | 12 inches from the finished back wall |
| Bathroom sink drain center | About 18 inches above the finished floor |
| Sink supply connections | About 21 inches high, spaced 8 inches apart |
| Shower valve center | About 48 inches above the finished floor |
| Shower head | Around 80 inches above the finished floor |
The selected fixtures and cabinet design control final placement.
Toilet Rough-In and Side Clearance
The standard commode rough-in is 12 inches, measured from the finished back wall to the flange center. Alternative units are also available for a 10-inch rough-in.
For planning, we recommend allowing at least 32 inches of side-to-side space. That recommendation differs from the ICC’s bathroom layout clearance guidance, which shows a 15-inch minimum from the toilet centerline to each side obstruction.
A toilet drain measured 12 inches from exposed framing won’t remain 12 inches from the wall after finishes are installed.
Sink, Shower, and Tub Placement
Sink height must account for the vanity, basin depth, drawers, and clearance for the lav drain and trap assembly. Shower controls need to suit the shower design and the people using it.
A tub box, when provided, leaves room around the planned drain connection for final adjustment. It doesn’t provide unlimited freedom to relocate the tub.
Planning Kitchens, Laundry Rooms, and Future Connections
Bathroom measurements get most of the attention, but the rest of the house needs the same coordination.
Kitchen plumbing must fit the sink base, basin depth, disposal if included, dishwasher, and refrigerator water connection. An island sink also needs a planned drain pipe and vent arrangement.
Whether on the main floor or in an unfinished basement, laundry connections must suit the washer location and leave room for hoses, shutoffs, drainage, and service access. Water heater connections need enough space for installation and maintenance.
Outdoor hose bibs and planned future equipment should appear in the layout before construction reaches this stage. Future connections are useful only when their locations and protection suit the intended equipment.
We recommend keeping the signed floorplan, plumbing drawings, cabinet drawings, appliance list, and fixture selections together. That gives everyone one clear reference for locations and included work.
A late cabinet change can affect plumbing even when the room dimensions stay the same.
Testing and Inspection Before Walls Close
Good-looking pipework isn’t enough. The system needs testing, required inspection, and documented correction of deficiencies before concealment.
Leak Testing and Pipe Protection
Open line ends are capped to keep debris out and prepare the system for testing. Depending on the system, material, and approved procedure, testing uses water or an approved air-testing method.
Compressed-air testing isn’t suitable for every pipe material. The licensed plumber handles the appropriate procedure rather than treating air and water tests as interchangeable.
The residential plumbing rough-in inspection checklist provides a useful picture of the items reviewed at this stage.
Pipe supports and protective plates also matter. Lines running near fastening surfaces need protection against later screw or nail damage.
Required Approval Before Concealment
A building code enforcement officer or authorized inspector reviews the applicable work before walls close. Inspection requirements follow the permit and construction design.
Tampa’s residential inspection requirements state that concealed plumbing must be completed, tested, and approved before covering.
We recommend keeping the inspection result and correction record with the project documents. A failed inspection needs correction and the required follow-up approval.
An independent pre-drywall inspection adds a buyer-focused review. It doesn’t replace required code inspections.
What Happens When a Drain Is Misplaced?
A builder-installed basement rough-in may not match a bathroom layout selected later. A drain can also conflict with the intended wall position, commode, vanity, or tub.
The first step is identifying the conflict against the approved layout and selected fixture. Measurements need to reference the finished wall and floor.
Sometimes a compatible toilet or a small approved layout adjustment resolves the issue. A tub box may provide enough adjustment for the final tub connection.
Other situations require cutting concrete, exposing the pipe, and rerunning the affected drain. That repair can also involve restoring disturbed fill, vapor-barrier protection, and the poured floor.
The licensed plumber should handle drainage corrections. Moving a connection without addressing the rest of the drainage arrangement can create another problem.
We recommend documenting the location, photograph, planned fixture, and required correction. Clear records keep the discussion focused on the work rather than assumptions about who caused it.
Key Takeaways Before the Next Building Stage
A useful homeowner review focuses on layout, access, protection, and records. You don’t need to evaluate every fitting yourself.
Before the final pour or drywall covers the plumbing:
- Compare fixture and equipment locations with the signed plans and selections, including kitchens, bathrooms, laundry areas, and outdoor connections.
- Photograph visible piping and underground work, and identify each image by room or location.
- Document concerns such as damaged pipes, missing caps, loose supports, inaccessible cleanouts, or connections that conflict with cabinets.
- Keep inspection approvals, correction records, and signed changes together.
Our new construction home inspection checklist places these checks within the broader pre-pour, pre-drywall, and final inspection schedule.
Arrange access through the builder. Active construction areas contain open trenches, exposed reinforcement, and operating equipment.
Frequently Asked Questions
Is There One Standard Height for Plumbing Rough-In?
No single height applies to every connection. Bathroom sink drains commonly sit about 18 inches above the finished floor, while shower valves are often around 48 inches.
Wall-mounted faucets, deeper sinks, floating vanities, and specialty fixtures can require different locations. The fixture and cabinet design determine the finished arrangement.
How Can Homeowners Recognize Plumbing Problems?
During construction, visible leaks, damaged pipes, unsupported lines, and unresolved inspection findings deserve attention. A rough-in inspection evaluates concerns before finishes hide the system.
After installation, recurring slow drains, sewer odors, damp cabinets, and unexplained water use can indicate trouble. A licensed plumber can diagnose the cause.
Does Passing Rough-In Mean the Plumbing Is Finished?
No. Finish plumbing still includes installing and connecting fixtures, faucets, toilets, and other equipment.
The completed system also needs operational testing and applicable final inspections. At the final walkthrough, hot and cold water, drainage, toilet operation, accessible shutoffs, and visible connections should all receive attention.
Reliable Plumbing Starts Before the Finishes
A successful plumbing rough-in puts connections in the right places and keeps them accessible for testing and inspection. Finished-wall measurements and coordinated fixture selections help prevent expensive changes later.
We recommend making layout and documentation priorities before concrete or drywall covers the work.
Keep your selections clear, record concerns by location, and retain approval records. Those practical steps support a home that’s easier to finish, maintain, and enjoy.